
How To Fix SS Tank Scratches?
You might get some scratches on your SS tank due to accidents while working with it, or when moving it (could be during delivery too). It won’t look shiny as before, but we’re here to help you to mitigate this awful scratch or scratches you got.
Our first tip for the amateurs is to get a skilled polisher to handle this. Otherwise, you might damage it further, and we don’t want this to happen.
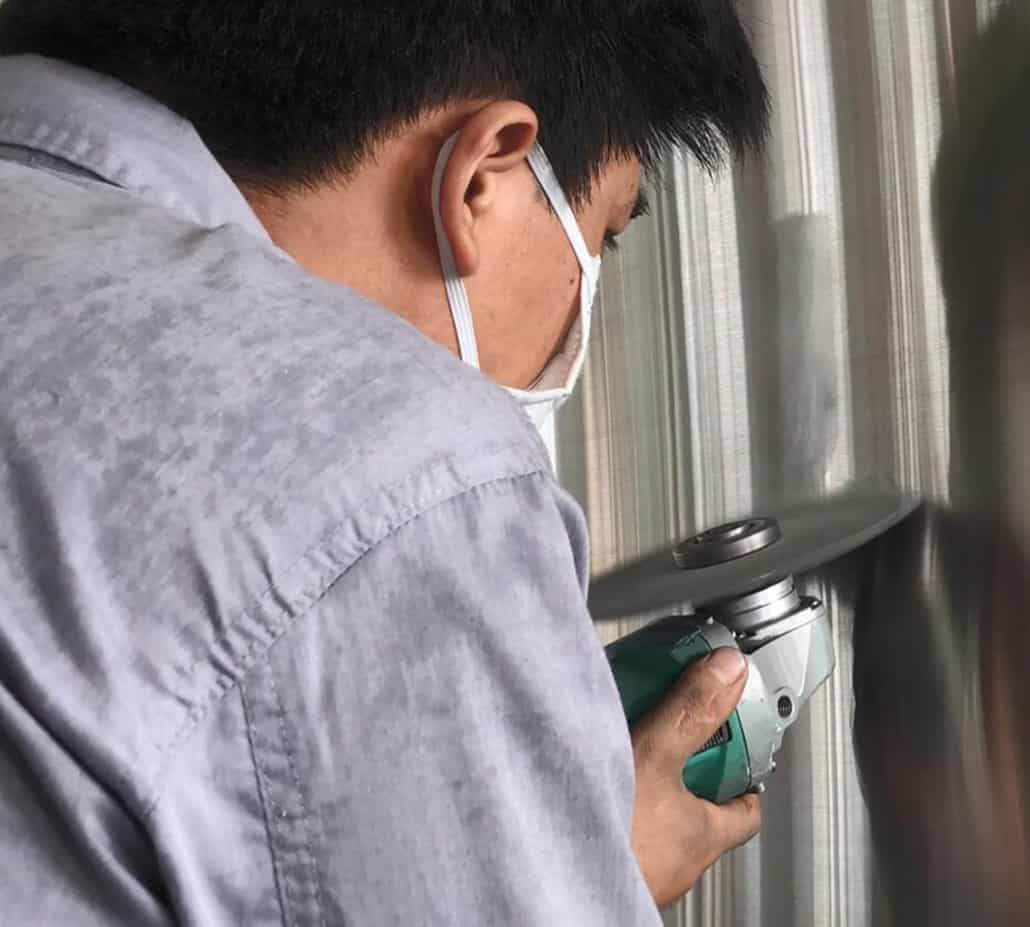
If you are skilled with polishing, here’s our advice: Choose the right polished wafer, then use angle grinder to fix the scratch.
Below is an example of the steps we took to fix SS tank scratch. This can be used for most light scratches.
- Firstly, use 120 meshes polished wafer to polish the scratch smooth and flat.
- Secondly, use 180 meshes polished wafer to polish the surface to be finer and smoother.
- Thirdly, apply the polishing paste on the scratch to make the surface more natural and bright. If the result doesn’t look good repeat the above steps or choose a suitable polished wafer.
- Finally, use sourcing pad polish the whole scratch to make sure you are in the same straight line direction as other parts of the SS wire drawing.

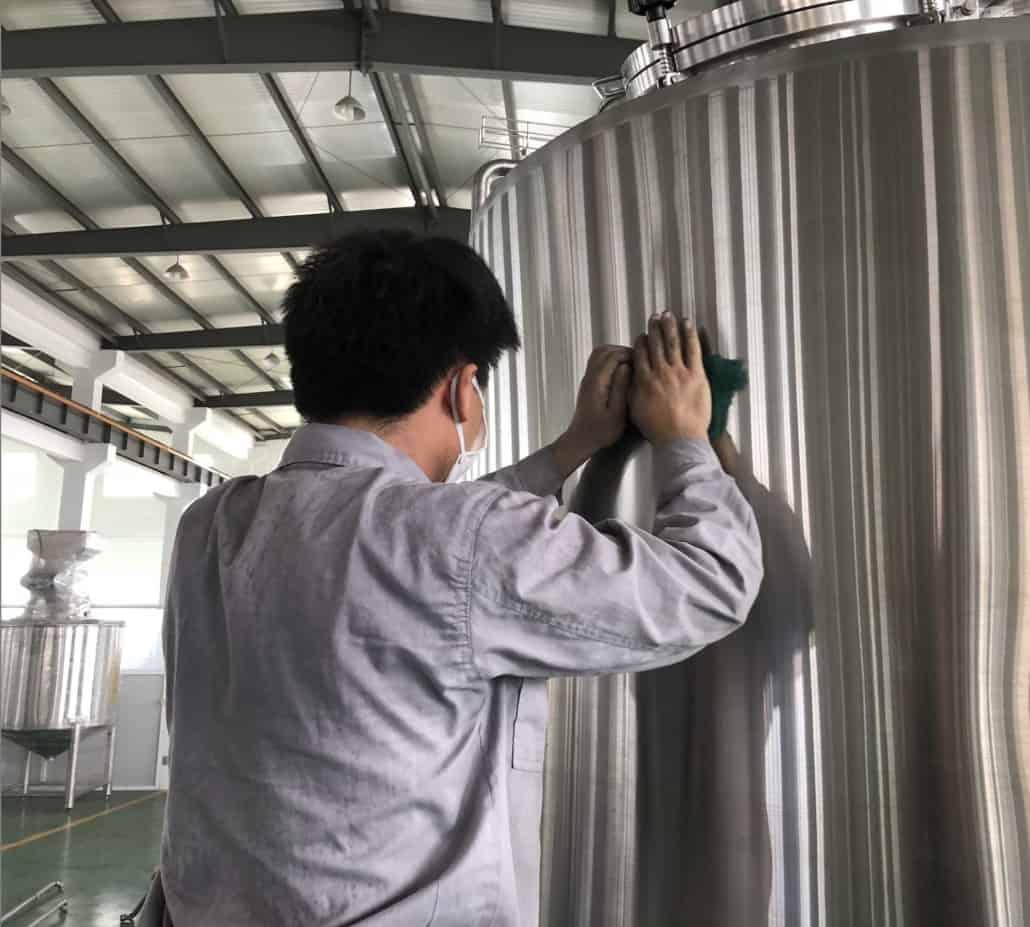
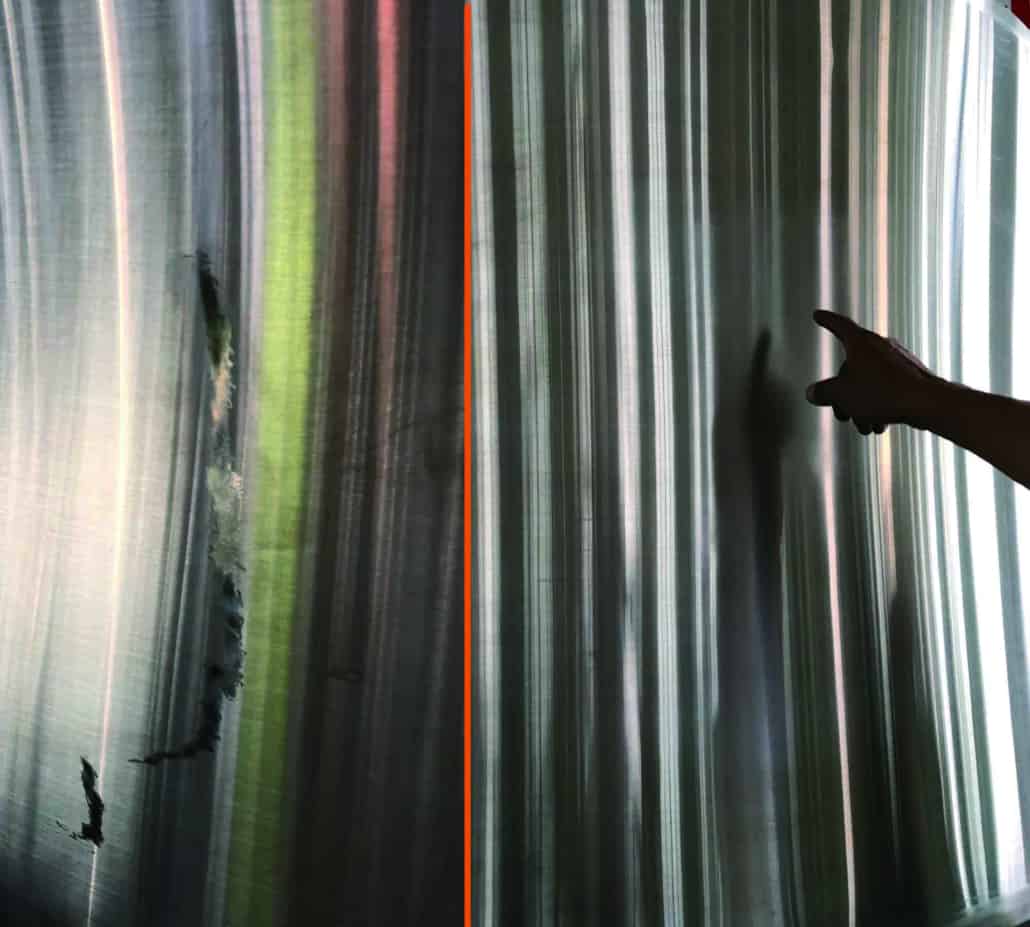
Please note: Over fixed polish can reduce the thickness of your SS shell, and may cause further damage to the tank. Also your tank might be very sensitive to such work, so make sure you are taking enough protecting measures, and avoid doing the job if you are not confident in your skills to repair it.
If you really got tired of your SS tank contact us today and let our experts to find you the right SS tank for your business.

Additional FAQs About Fixing SS Tank Scratches
1) How do I tell if an SS tank scratch is only cosmetic or a passivation risk?
- If the scratch removes the passive layer or exposes embedded iron, you may see flash rust or discoloration after caustic/acid cycles. Perform a water break test or copper sulfate test. If discoloration appears, re-passivation is recommended.
2) Should I sand in one direction or cross-sand?
- Match the original grain. For brushed/No.4 finishes, sand in the existing grain direction only. Cross-sanding creates visible swirls that are difficult to blend.
3) What abrasive sequence works for typical brushed stainless (No.4) surfaces?
- Start localized with 120–180 grit to level the scratch, blend with 240–320 grit, then finish with nonwoven (e.g., maroon/gray Scotch-Brite) in the grain. Avoid skipping more than one grit step.
4) Do I need to re-passivate after repairing SS tank scratches?
- Yes, especially for food/beverage tanks. After mechanical polishing, clean, degrease, then passivate (citric or nitric per ASTM A967) and thoroughly rinse. This restores corrosion resistance.
5) Can deep gouges or dents be fixed in the field?
- Only to a point. Deep gouges may require weld repair (GTAW with matching filler), regraining, and full re-passivation. If shell thickness loss would exceed tolerance, replace or consult the tank OEM.
2025 Industry Trends for SS Tank Scratch Repair and Finishing
- Shift to citric-based passivation: Breweries and food processors favor citric acid gels for safer, on-site re-passivation after scratch repairs.
- Portable finishing kits: OEMs offer matched abrasive kits and color-coded steps for common stainless finishes to reduce technician variability.
- Surface metrology on the floor: Handheld roughness meters (Ra/Ry) now common to validate finish after blending repairs.
- Electropolish touch-up protocols: High-spec zones (e.g., aseptic fittings) use localized electropolish pens after mechanical blending.
- Documentation by default: Digital maintenance logs with before/after photos and Ra readings support audits and warranty claims.
2025 Data Snapshot: SS Tank Scratch Repair Practices
| Metric | 2022 | 2024 | 2025 (proj.) | Notes / Sources |
|---|---|---|---|---|
| Sites using citric passivation for post-repair | 48% | 61% | 68–72% | Fabricator surveys; BA/IBD sanitation sessions |
| Adoption of handheld Ra meters in breweries | 22% | 34% | 40–45% | QA tool vendors; plant maintenance polls |
| Use of OEM-matched abrasive kits | 28% | 39% | 45–50% | Supplier catalogs; MRO distributors |
| Repairs logged with photo/Ra evidence | 18% | 30% | 38–42% | Audit reports; quality programs |
| Incidents of post-repair corrosion claims | — | −10% vs. 2022 | −15–20% vs. 2022 | Insurer/QA anecdotes; vendor case notes |
Sources:
- ASTM A967/A967M-17 (Passivation): https://www.astm.org/a0967_a0967m-17.html
- NACE/AMPP resources on stainless corrosion: https://www.ampp.org
- Brewers Association Sanitation/QA: https://www.brewersassociation.org
- Institute of Brewing & Distilling: https://ibd.org.uk
Latest Research Cases
Case Study 1: Citric Re-passivation Eliminates Flash Rust After Scratch Blend (2025)
Background: A brewpub’s 304 SS brite tank developed visible swirls and slight discoloration after an aggressive scratch removal with 120 grit.
Solution: Reworked finish using 180→240→320 grit sequence, nonwoven regrain to match No.4, alkaline degrease, then citric gel passivation (per ASTM A967, 20–30 min), DI rinse, and water break test.
Results: Discoloration resolved; Ra restored from 1.2 µm (post-120 grit) to 0.6–0.7 µm; no flash rust after 8 CIP cycles; QA accepted. Sources: Brewery maintenance log; BA quality forum summaries.
Case Study 2: Weld Repair vs. Blend Decision on Deep Gouge (2024)
Background: A 316L unitank suffered a 0.6 mm deep gouge near a manway from a dropped clamp.
Solution: Thickness gauged with ultrasonic meter; decision to GTAW fill with 316L filler, grind flush, 240→400 grit blend, localized electropolish pen, then full citric passivation.
Results: Passed dye penetrant test; final Ra 0.5–0.6 µm; no ATP failures over 3 months; avoided tank replacement, saving ~$8,000. Sources: OEM service bulletin; fabricator application note.
Expert Opinions
- Dr. Charlie Bamforth, Distinguished Professor Emeritus of Malting & Brewing Science, UC Davis
Viewpoint: “A smooth, cleanable stainless surface is fundamental to flavor stability. After fixing SS tank scratches, validate cleanability—not just appearance.” - Katherine C. Smart, Professor of Brewing Science; Former Global VP R&D, AB InBev
Viewpoint: “Documented passivation after mechanical repairs reduces contamination risk. Adopt standard work with Ra targets and verification tests.” - Michael Pfeifer, Metallurgical Engineer and author of “Materials-Enabled Designs”
Viewpoint: “Match filler metal and restore the passive film. Skipping re-passivation is the most common root cause of premature corrosion after cosmetic fixes.”
Citations:
- UC Davis brewing resources: https://cpe.ucdavis.edu
- ASTM A967 passivation guidance: https://www.astm.org/a0967_a0967m-17.html
- AMPP (NACE) corrosion control: https://www.ampp.org
Practical Tools and Resources
- ASTM A967/A967M Passivation standard: https://www.astm.org/a0967_a0967m-17.html
- AMPP corrosion resources for stainless repairs: https://www.ampp.org
- 3M Finishing Guides (abrasive selection for stainless): https://www.3m.com
- Brewers Association Sanitation and Tank Care: https://www.brewersassociation.org
- Handheld surface roughness testers (Mitutoyo, Taylor Hobson) vendor pages
- Food-contact compliant citric passivation gels and neutralizers (major MRO suppliers)
Note: Always verify tank material (304 vs. 316/316L), finish spec (e.g., No.4, 2B, electropolished), and wall thickness before repair. Protect adjacent areas, control heat, and keep abrasives dedicated to stainless to prevent ferrous contamination. Finish with cleaning, passivation, and documented inspection.
Last updated: 2025-09-02
Changelog: Added 5 focused FAQs, 2025 trend snapshot with data table, two recent repair case studies, expert commentary, and a curated tools/resources list with authoritative links for fixing SS tank scratches and re-passivation.
Next review date & triggers: 2026-01-15 or earlier if ASTM/AMPP guidance updates, BA sanitation recommendations change, or corrosion claim rates rise >10% year-over-year.
Share this entry
Interested in learning more about Brewing Systems including additional details and pricing information? Please use the form below to contact us!
YOLONG BREWERY EQUIPMENT FAQS
- Commercial Brewery / Craft Brewery / Microbrewery / Nanobrewery
- What is The Difference Between Craft Beer and Industrial Beer?
- The Bespoke Differences In Custom Brewing Systems
- Everything You Need to Know About Kettle Souring
- How to Choose Brewing Equipment for Your business?
- How To Choose The-Best Partner To Build Your Commercial Microbrewing System?
- Two Detection Sensors That You Need To Use In Your Brewhouse System
- Remote Control Applications in Brewing Equipment/How does it work?
- How To Clean Your Brand New Brewery Tanks?